

How To Do The Diy Setting On Led Lights
When it comes to ownership and installing RGB LED strips, there are several options available. Some come with an IR or RF remote control to modify the RGB light color, brightness, or pattern, while others (more than expensive ones) characteristic an Android or iOS app that allows yous to control the RGB light and display colors with your smartphone.
The RF or IR-controlled RGB strips display pre-configured colors only and limits you from creating any custom color or displaying DIY colors.
However, you can change or upgrade an IR or RF remote-controlled RGB strip that you may already accept—and employ an app on your smartphone to command and display DIY colors.
Steps to Make RGB LED Strip Brandish DIY Colors
To brand an IR or RF-controlled RGB LED strip display DIY colors and control it through a smartphone app, you can build a Wi-Fi RGB controller using an ESP8266-based MCU. In this project, nosotros will disconnect the LED strip from its mill module, build an RGB controller using ESP8266 to display DIY colors, and control effulgence and color intensity.
Things Y'all Volition Need
To make your DIY LED calorie-free colors, you'll need the following:
- An ESP8266-based MCU, such as NodeMCU or D1 Mini
- Cheap IR/RF controlled RGB Strip
- Some Wires
- Berg Strip (optional)
- Three IRF540 or TIP120 transistors
- Iii 1K resistors
- 12V power supply for LED strip (comes with the IR/RF RGB strip)
One time you lot've got each of these items, you can move on and begin your project.
Step ane: Download and Wink the Firmware
Download the Tasmota sensors.bin firmware file on your Windows or Mac computer. Make certain you download the right firmware for your ESP8266 to avoid bug later.
After downloading the firmware, download and install the device drivers.
- CP2102 driver
- CH341 driver
Once you've downloaded the drivers, complete the following steps:
- Download the Tasmotizer tool and run it.
- Connect the ESP8266 to your PC using a USB cable.
- Select the COM port where the ESP8266 is connected.
- Click Scan and select the Tasmota Sensor.bin firmware file.
- Click Tasmotize.
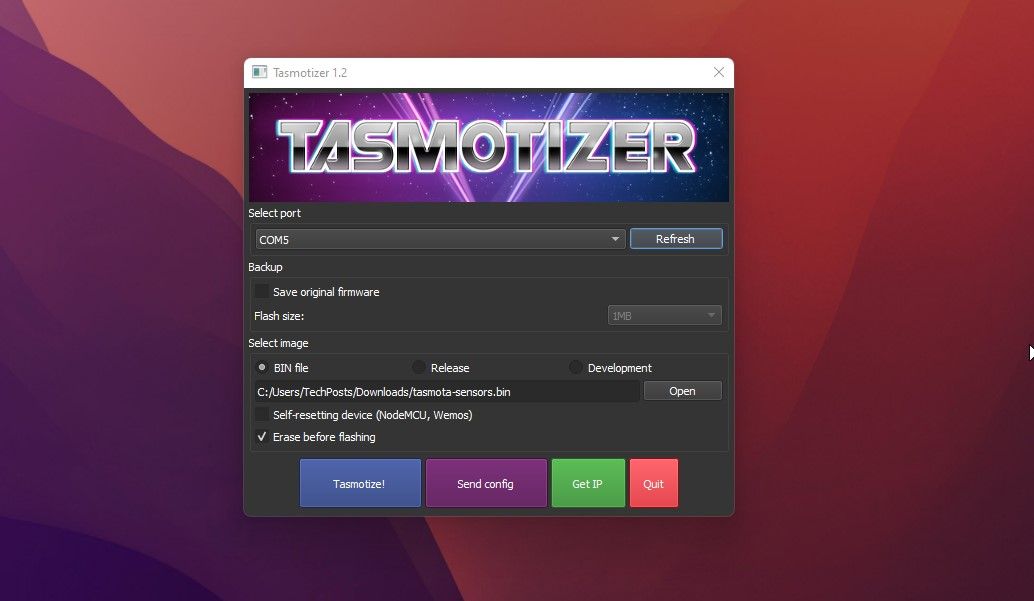
This volition wink the firmware.
Step 2: Configure the ESP8266
On your smartphone, open Wi-Fi settings and then connect to the tasmota-xxxx Wi-Fi network. It's an open up network and thus, doesn't require any password.
Once connected, open the web browser and visit 192.168.4.one, select the Wi-Fi network, enter the necessary password, and click Save.
After a while, you volition run across an IP address. Enter that IP accost in the spider web browser on your smartphone or PC connected to the same network.
When yous've completed the steps listed to a higher place, follow these steps:
- Click Configuration > Configure Module.
- Select Generic 0 from the drop-down and click Relieve.
- Information technology will reconnect and reload automatically.
- Click Configuration > Configure Module.
- Select PWM in D1, D2, D3 pin and choose i, two, three from the respective drop-downs for Blood-red, Greenish, and Blue colors. Click Save.
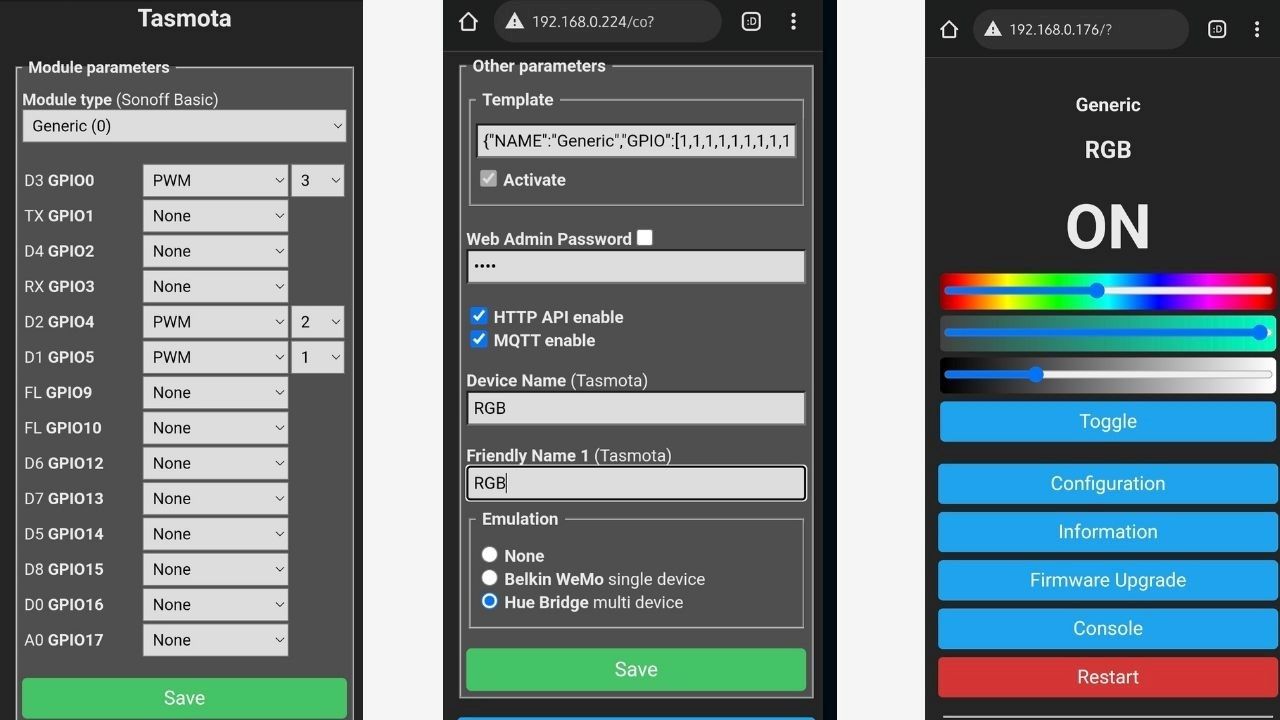
Afterward the restart, y'all volition see three slider controls with a Toggle button to control the lights, alter colors, and control intensity and brightness to display DIY colors.
Footstep 3: Connect RGB Strip to ESP8266
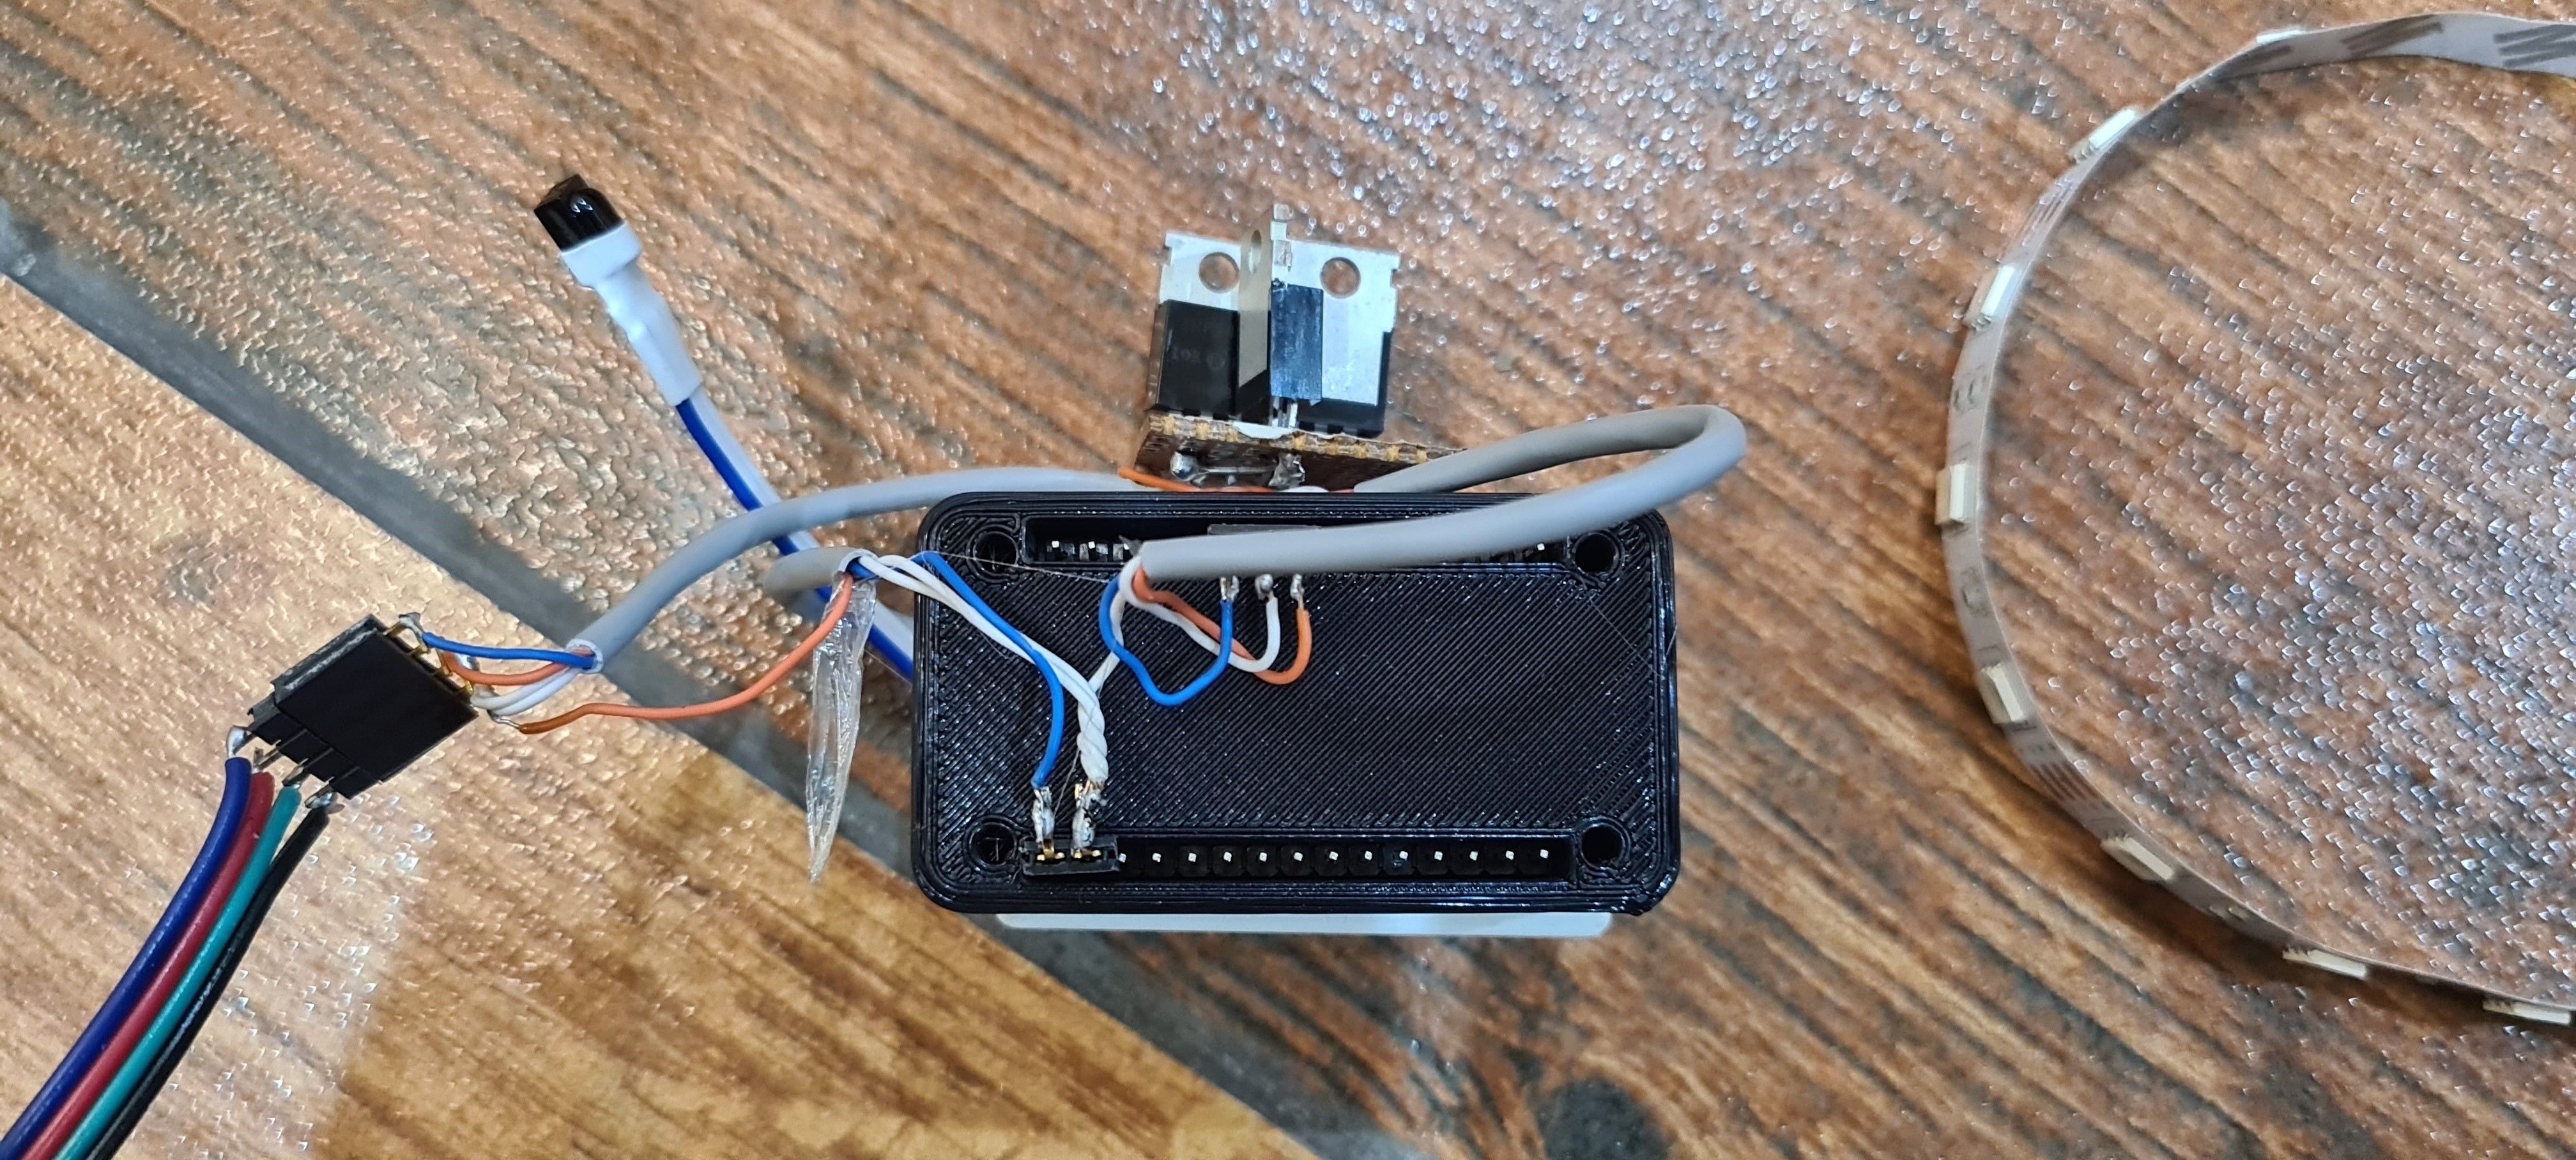
Open the RF/IR controller module that came with the RGB strip before disconnecting or desoldering the four wires connected to it. You can refer to this guide to learn how to desolder.
Afterward desoldering, refer to the beneath diagram to connect the RGB LED strip to the ESP8266 module and the three IRF540 or TIP120 transistors.
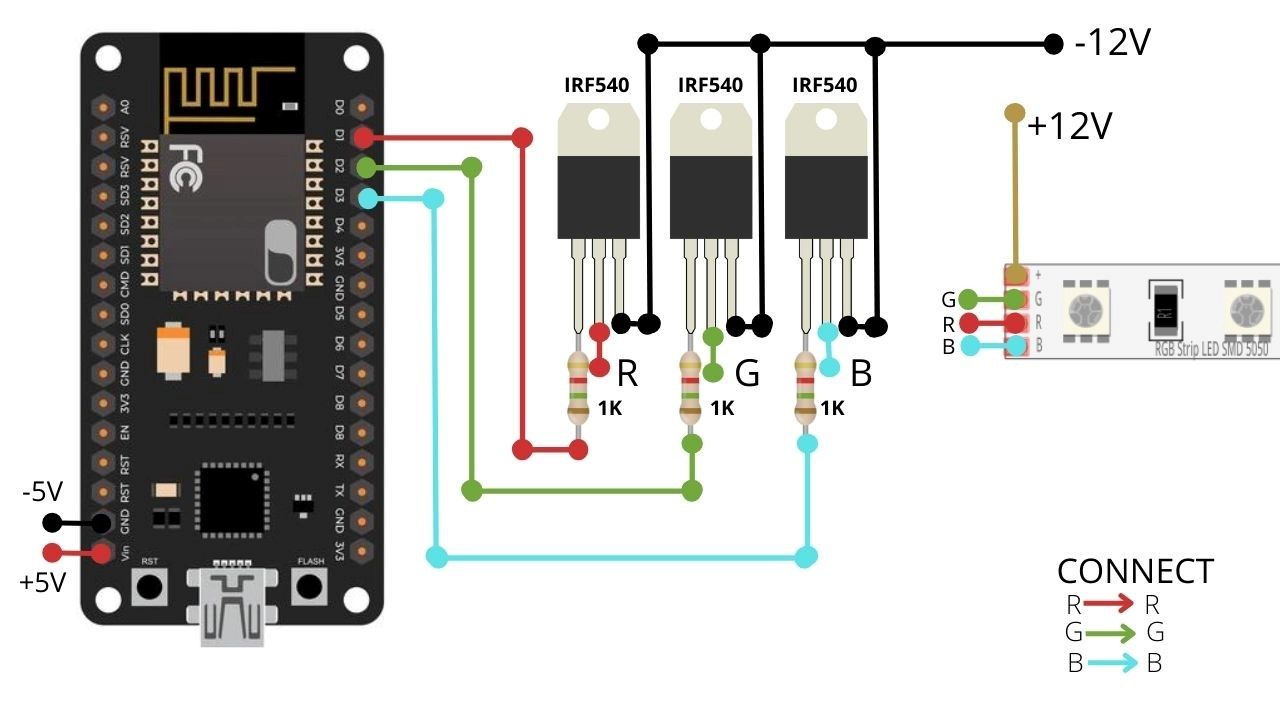
- Connect NodeMCU or D1 Mini pins D1, D2, and D3 to the gate (1st) legs of the 3 IRF540 or TIP120 transistors using 1K resistors.
- Connect the Source legs to the basis.
- Connect the Bleed legs to the Red, Green, and Blue connectors on the LED strip.
You can use the 12V power supply that came with the RGB strip to supply power to the strip and the MCU. You lot tin can convert the 12V to 5V for NodeMCU or D1 Mini using a 7805 voltage regulator and two 10Uf 50V capacitors.

Brand sure yous connect the wires exactly as shown in the diagram. If you connect the power supply to the wrong wires, information technology may damage the RGB LED strip.
Utilise the desoldered wires from the RGB strip module to connect the RGB strip to your NodeMCU or D1 Mini. You may also employ jumper wires for making the connections or straight solder the wires to the MCU. If you have never soldered earlier, refer to our guide to learn how to solder.
We used a berg female strip for making connections to the NodeMCU.
Once continued, you tin control the RGB color, intensity, and brightness through the spider web browser app on Android or iOS devices.
Step four: Use App on Android or iOS Devices to Control RGB Light Strip
Yous tin apply any spider web browser app to open the Tasmota panel and control the RGB lite color, effulgence, and intensity. Y'all may also enable Hue Bridge emulation in Tasmota to control and use the Amazon Alexa app on your Android or iOS devices to command the RGB strip.
With Hue Bridge emulation, you tin also command the RGB lights and change color and effulgence. You lot can do these through vocalisation commands via Repeat devices or Alexa vocalization banana. The steps are equally follows.
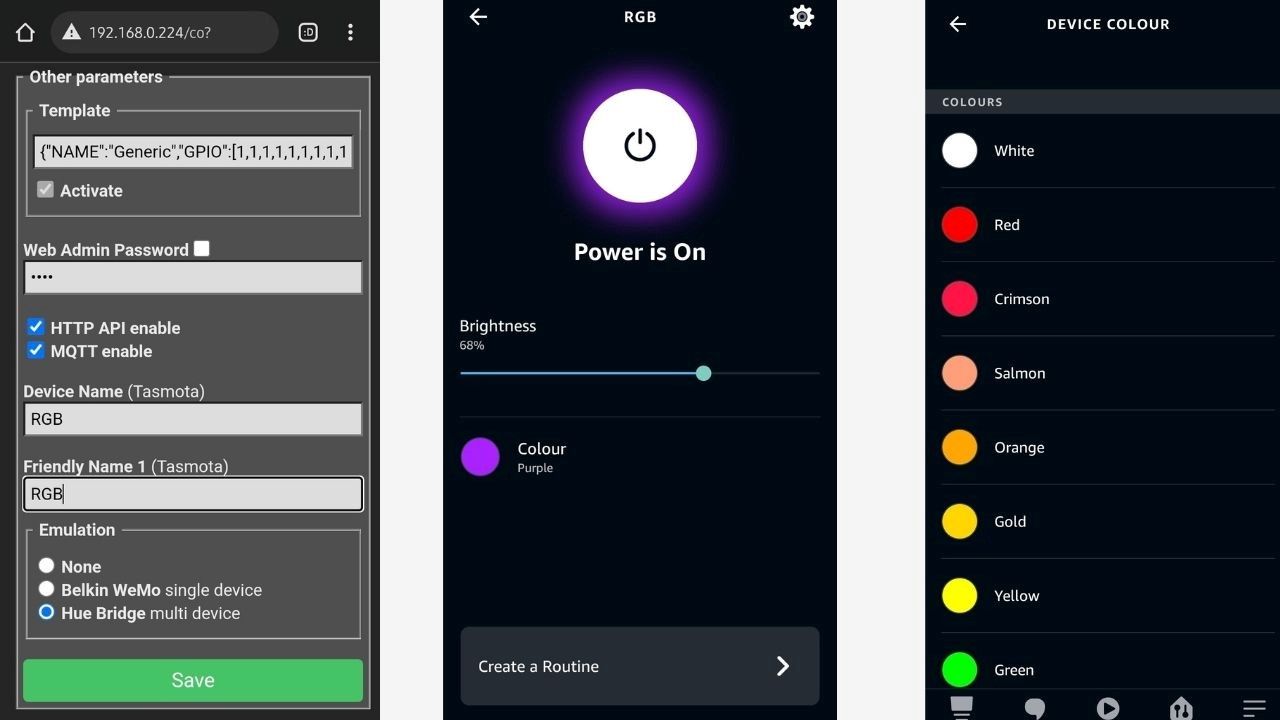
- Open Tasmota web panel and go to Configuration > Configure Other.
- Name your device, such as RGB, so select Hue Span under Emulation. Click Save.
- On your Android or IOS device, download and install the Amazon Alexa app.
- Sign in with your Amazon account and get to Devices.
- Run a device scan. Yous may also ask Alexa on Echo devices to notice the RGB low-cal on your network. Just say: "Alexa, discover devices".
In one case the device is added, you can control the RGB lite, brightness, and change colour through the Alexa app and Echo devices using vocalization Commands.
Control RGB Lights Over the Internet
Yous tin can employ the MQTT protocol or Alexa app (requires an Repeat device at the location) to command your upgraded RGB LED strip over the internet. For this, you lot tin use a public or individual MQTT banker. Yous will besides demand an MQTT client app on your smartphone (a few are available on the Play Store).
One time prepare up, you can add buttons on the MQTT Android app to ship JSON information to alter or display DIY colors. Further, you can apply Home Banana and ESPHome to command the modified RGB lights, display DIY colors and add automation.
Source: https://www.makeuseof.com/diy-led-light-colors/
0 Response to "How To Do The Diy Setting On Led Lights"
Post a Comment